
Getting started in stargazing
With a whole Universe to explore, astronomy can become a lifelong interest providing endless wonder. Here are some of my top tips for starting out in the world of stargazing.
You don’t need a telescope
Let’s get one thing clear from the outset: you do not need a telescope to be an astronomer, or to enjoy the night sky.
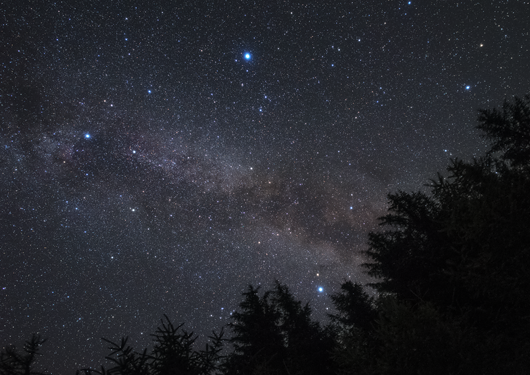
There are many astronomical phenomena that you only need your eyes to see. These include magnificent Full Moon rises, the sprawling winter constellations, the glowing band of the summer Milky Way, as well as meteors, noctilucent clouds and striking alignments of the Moon & planets. And, if you live in the southern hemisphere, you’ve got several of the above plus our galaxy’s spectacular core region and two of its neighbouring galaxies, the Magellanic Clouds, to marvel at too.

JARGON EXPLAINED: THE MILKY WAY, OUR ‘GALAXY’ & THE SOLAR SYSTEM – WHAT’S THE DIFFERENCE?
The Milky Way is the name that astronomers give to the faint swathe of light that arches across the night sky. This glow is the light of multitudes of distant suns inside a huge swirl of (literally) billions of stars, called a ‘galaxy’. That galaxy, our galaxy, takes its name from the misty band of light we see – so it’s called the Milky Way galaxy. There are likely trillions of other galaxies scattered across the Cosmos too. Our Sun, meanwhile, is one of the many stars moving within the spiral form of the Milky Way galaxy, and our Solar System is the collection of planets, moons, asteroids & comets that joins it on that journey.
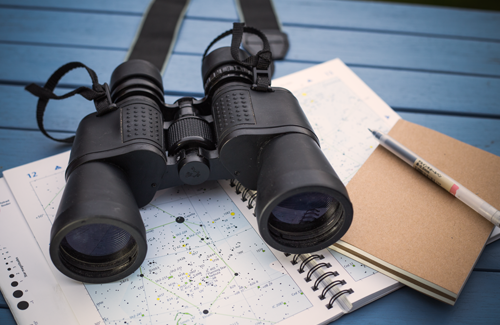
Look into binoculars
A lot of people think of a telescope as the quintessential piece of astronomy kit, but if you’re just starting out I’d pretty much always recommend binoculars as an entry point to exploring the night sky further. They’re usually easier to get to grips with and can reveal myriad star clusters, some of the brighter nebulae and galaxies, as well as the Galilean Moons of Jupiter and the larger features on our own Moon.
What’s more, you can get a good, optically sound, pair (that will still be useful years down the line) for far less than what you’d need to spend to get a decent-quality starter scope.
STARGAZING TIP 🔭 There are dedicated apps and specialist software programmes available that can simulate the night sky from any location on Earth at a given time & date. These can be a great way to learn your way around the stars and enable you to see what’s ‘up’ to look at. One of my favourites is the superb, free programme Stellarium.
Allow your eyes to become ‘dark adapted’
Our eyes are incredible tools for exploring the night sky, but in order for them to be working at their best under the stars they need to get used to the darkness. Astronomers call this getting ‘dark adapted’ and it’s crucial if you want to see fainter stars and other tricky-to-spot objects like glowing nebulae & distant galaxies.
What it means in practice is that, when you step out to look up at a glittering night sky, your eyes will (ideally) need at least 30-40 minutes in darkness before they’re adapted to the absence of artificial light. If you need to shine a light to look around while stargazing, use one with a red filter or LED, as this’ll have less impact on your dark adaptation.
JARGON EXPLAINED: CONSTELLATION
A constellation is a pattern of stars typically representing a figure, creature or object. There are 88 ‘official’ constellations in modern astronomy, but different cultures around the world also have their own groupings that they recognise too.
Try to avoid bright lights
It’s an inescapable fact that the night sky is becoming more and more hidden by the poorly directed lights of our towns and cities. This light pollution often fills the sky over urban areas and hides fainter stars, making it hard – or in some cases impossible – to see many celestial sights.
If you’re out stargazing try not to have any bright lights within your line of sight and, if you can, find an observing location (that’s safe) away from skyglow. Some astronomical societies have their own observatories and dark-sky viewing sites which you may be allowed to visit, so get in touch with your local group.
Steer clear of moonlit nights
The Moon is a wonderful object to observe with a small telescope or binoculars, but its beautiful silvery light can create problems for other types of astronomical observing.
The milky blue twilight that fills a moonlit sky can make viewing faint stars and other low-brightness targets (like glowing nebulae or the star fields of the Milky Way) tricky, so if you’re looking out for those choose a night to observe when the Moon is ‘new’ or only showing a thin crescent.
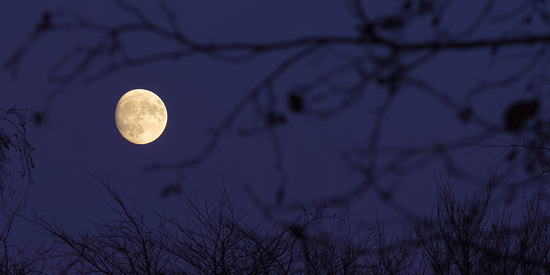
STARGAZING TIP 🔭 A Full Moon is not just a problem when trying to track down faint objects, it also happens to be the worst time to observe our nearest neighbour with a telescope. That’s because at full Moon the side facing us is lit directly from above, so there are little to no shadows being cast to pick out & accentuate features on the surface.
Look for simple patterns at first
When you step out under the stars – particularly in a place with dark skies – one of the most challenging things that beginners often face is the sheer number of points of light. How do you navigate the view you’re seeing and know which dot is which star, or where to find one constellation or another?
The best way to begin getting your bearings, in my opinion, is to look for large, simple patterns at first, and then learn to relate them to smaller, nearby arrangements of fainter stars, using a star chart or app to guide you.
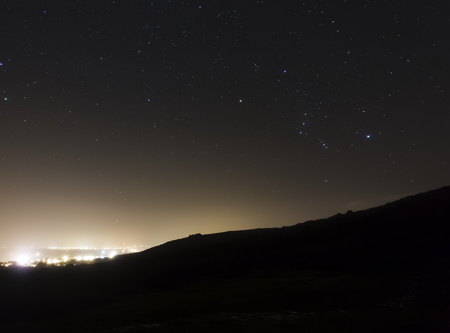
For example, in the northern winter, a useful starting point is the conspicuous trio of stars in Orion’s Belt; in summer it might be the huge ‘Summer Triangle’ made of the three dazzling stars Altair, Vega & Deneb, while in spring the bright stars in the head of Leo (which look like an enormous backwards question mark) make a handy visual anchor.
With practice, this method becomes second nature, and when combined with the more linear technique of star ‘hopping’ (described below) you’ll find locating celestial targets becomes much less daunting.


STARGAZING TIP 🔭 If astronomers are trying to view a faint object (say, a faint star cluster, nebula or galaxy through a telescope eyepiece) they will often not look directly at where the object is, but just to the side of it. This allows the light from the object to fall on the more sensitive part of the retina in our eye and so makes the object clearer to see. It’s a technique called ‘averted vision’.

Hop your way around the sky
As you get more proficient at recognising the constellations and other patterns of stars, you can begin to move around the sky with ease.
One method that is used frequently by amateur astronomers – particularly those using binoculars, but also small telescopes – is star hopping. This is where you move from star to star using them as signposts, either by them pointing the way to travel or as visual ‘checkpoints’ as you scan across the night sky at the eyepiece. It’s an effective naked-eye navigational method too.
On the left I’ve outlined an example of a well-known basic star hop using the three stars of Orion’s Belt as the starting point. The bright belt stars point up towards the constellation of Taurus, the Bull, and down to the brilliant star Sirius, in the constellation Canis Major. From Taurus you can traverse the Bull’s ‘horns’ up to get to other constellations and objects. For example, there’s a lovely binocular and small scope target at the ‘feet’ of Gemini – the open star cluster M35 – that you can get to by following the line of Taurus’ lower horn.
STARGAZING TIP 🔭 As well as the 88 ‘official’ constellations, there are other notable patterns of stars called ‘asterisms’. These are typically geometric shapes (e.g. The Summer Triangle) or groupings that, like constellations, resemble things (e.g. the Teapot, in Sagittarius).
Manage your expectations
One of the things that many newcomers to astronomy discover is how different celestial objects look to the eye compared to their depictions in astrophotographs online, or in books, magazines and TV programmes. In some cases this can be something of a disappointment, so it’s always worth bearing in mind what to expect when you’re going out stargazing, or looking through a telescope, for the first time.
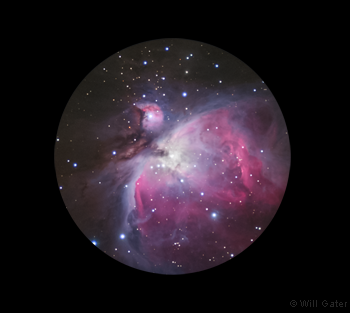
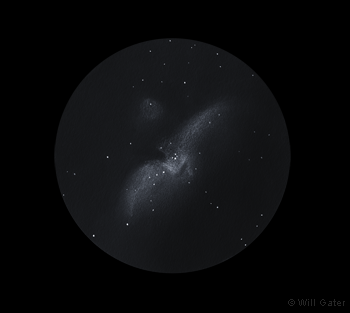
Use the slider above to see a comparison between an image of the Orion Nebula as captured by a specialist astronomical camera and a visual sketch I made at the telescope eyepiece.
Modern cameras are far more sensitive than our eyes, and they can continually gather the faint light of distant astronomical targets to create detailed pictures with rich, spectacular colours. Our eyes, though, can only detect the light falling on them at that instant, meaning the view of most galaxies and nebulae through a small telescope is usually one of a dim, often fuzzy, greyish form.
Through larger telescopes you can begin to see more detail, shape and texture in these objects, which is one reason why visiting local astronomy groups – who may have access to bigger instruments – can be really useful when you’re starting out.
The brighter so-called ‘open’ star clusters generally look pretty impressive even in basic equipment, but globular clusters tend to look like faint, greyish circles through smaller aperture scopes; you, typically, need a telescope with a mirror about 150-200mm in size to see the brighter examples as granular-looking swarms of thousands of stars.
WHAT THE CAMERA CAPTURES VERSUS WHAT THE EYE SEES
In these images I’ve taken one of my photos of the summer Milky Way – captured using a long-exposure with a DSLR camera – and edited it to try to give a feel for what the view actually looked like to my eyes.

The flip side to all this is that as you gaze at these objects you’re viewing ancient light that’s often travelled for millennia just to fall on your eye. That’s no small thing in my opinion. And even if a galaxy appears as a little, grey smudge, what you’re seeing in that moment through the telescope is typically the combined light of billions of immensely-distant stars.
It’s all a matter of perspective. I’ve certainly found that a subtle view at the eyepiece can produce a profound sense of wonder when you begin to reflect on what it actually is you’re looking at.
The Moon & planets do appear impressive in even small telescopes. With a 80mm refractor or 10-15cm aperture reflector you’ll have no trouble seeing the rings of Saturn or the larger cloud bands on Jupiter; but note that even at high magnification the planets’ discs will still appear quite small in the eyepiece. Below is a sketch of Saturn and some of its moons made with an 200mm reflector.

